
From Local to Production: Dockerizing a NestJS API

Suman S.

Jan 12, 2026
Every backend engineer has heard it at least once:
“But it works on my machine.”
Node.js applications — especially NestJS APIs — are notorious for breaking once they leave local development. A different Node version, a missing dependency, or an undocumented environment variable is often all it takes to turn a clean deploy into a debugging session.
Docker eliminates this entire class of problems.
In this guide, we’ll walk through building a production-grade Docker setup for a NestJS application. We’ll start with a minimal Dockerfile, evolve it into a secure, multi-stage build, and then orchestrate the application using Docker Compose. Finally, we’ll look at how this setup extends naturally to databases and Nginx in real-world deployments.
Why Docker Belongs in Production
Traditional Node.js deployment often looks like this:
- SSH into a server
- Install Node.js
- Install dependencies
- Pull code
- Run the app
This approach is fragile and difficult to reproduce. Any mismatch between environments can — and eventually will — cause failures.
Docker replaces this workflow with immutable artifacts.
When you containerize an application, you package:
- The runtime (Node.js)
- Dependencies
- System libraries
- Application code
…into a single image that behaves the same everywhere it runs.
What You Gain
- Consistency
- If the image builds locally, it will run the same way in staging and production.
- Isolation
- Multiple services — and even multiple Node versions — can coexist on the same host without conflict.
- Explicit Versioning
- The Node.js version is defined in the image, not implied by the server.
- Scalability
- Scaling becomes a matter of starting more containers, not reconfiguring servers.
- Portability
- The same image runs on AWS, Azure, DigitalOcean, or a bare-metal server.
At scale, Docker isn’t just a deployment tool — it’s a reliability strategy.
Prerequisites
Before getting started, ensure you have:
- Docker or Docker Desktop installed and running
- A NestJS application with a working build step (npm run build)
The Plan
We’ll build this setup incrementally:
- 1. Create a production-ready Dockerfile
- 2. Reduce build context with .dockerignore
- 3. Orchestrate services using Docker Compose
- 4. Extend the stack with a database and Nginx
Each step moves us closer to a deployment model that mirrors real production systems.
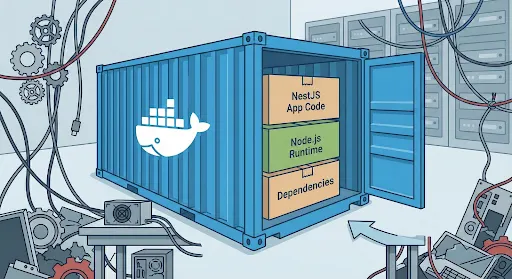
Step 1: A Production-Ready Dockerfile
Create a Dockerfile in the root of your NestJS project.
Rather than shipping source code and build tools to production, we’ll use a multi-stage build. This keeps the final image small, secure, and focused solely on runtime concerns.
# -------- Build Stage --------
FROM node:22-alpine AS builder
WORKDIR /usr/src/app
COPY package*.json ./
RUN npm ci
COPY . .
RUN npm run build

# -------- Production Stage --------
FROM node:22-alpine
WORKDIR /usr/src/app
ENV NODE_ENV=production
COPY package*.json ./
RUN npm ci --omit=dev
COPY --from=builder /usr/src/app/dist ./dist
EXPOSE 3000
CMD ["node", "dist/main.js"]
Why This Matters
- Smaller images → faster pulls and startups
- No dev dependencies in production
- Clear separation between build and runtime
- Reduced attack surface
This structure is the baseline for production Node.js containers.
Step 2: Ignore What Doesn’t Belong in the Image
Docker sends your entire project directory to the build context unless you tell it otherwise. That’s slow — and unnecessary.
Create a .dockerignore file:
node_modules
dist
npm-debug.log
.git
.gitignore
Dockerfile
This keeps builds fast and images clean.
Step 3: Build and Run the Container
At this point, the container can be built and run manually:
docker build -t nestjs_demo .
docker run -p 3000:3000 nestjs_demo
The API will be available at http://localhost:3000.
Manual runs are useful for validation — but they don’t scale well. That’s where Docker Compose comes in.
Step 4: Orchestrating with Docker Compose
Docker Compose lets you define your infrastructure declaratively. Instead of remembering CLI flags, you describe services, ports, and dependencies in version-controlled YAML.
Create a docker-compose.yml file:
services:
  api:
    build:
      context: .
      dockerfile: Dockerfile
    container_name: nestjs_demo
    restart: always
    ports:
      - "3000:3000"
Run the application:
docker-compose up --build -d
Your NestJS API is now running in a managed container, detached in the background.
Compose becomes especially powerful as soon as your application grows beyond a single service.
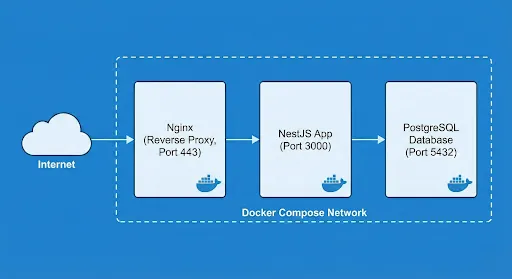
Extending the Stack: Databases and Nginx
In production, APIs rarely run in isolation. They depend on databases and are almost always placed behind a reverse proxy.
Adding a Database
Instead of installing PostgreSQL or MySQL on your host machine, define it as a service:
db:
  image: postgres:15-alpine
  environment:
    POSTGRES_USER: user
    POSTGRES_PASSWORD: password
    POSTGRES_DB: mydb
Docker networking allows the API to connect using the service name (db) as the hostname—no IP management required.
Adding Nginx as a Reverse Proxy
Exposing a Node.js process directly to the internet is rarely a good idea.
Nginx handles:
- TLS termination
- Request routing
- Connection upgrades (WebSockets)
- Connection upgrades (WebSockets)
Example nginx.conf
server {
  listen 443 ssl;
  ssl_certificate /etc/nginx/certs/site.crt;
  ssl_certificate_key /etc/nginx/certs/site.key;
  location / {
    proxy_pass http://api:3000;
    proxy_set_header Host $host;
    proxy_set_header Upgrade $http_upgrade;
    proxy_set_header Connection "upgrade";
  }
}
Update docker-compose.yml:
nginx:
  image: nginx:alpine
  ports:
    - "443:443"
  volumes:
    - ./nginx.conf:/etc/nginx/nginx.conf:ro
  depends_on:
    - api
In practice, TLS certificates are typically managed via Let’s Encrypt or a cloud load balancer, but the architecture remains the same.
Final Thoughts
Dockerizing a NestJS application isn’t just about convenience — it’s about eliminating uncertainty.
By packaging your API as an immutable artifact, you gain:
- Predictable deployments
- Safer environment parity
- Faster onboarding for new engineers
- A clean foundation for CI/CD pipelines
You can now hand this repository to any developer, run docker-compose up, and know they’re running the same stack that production uses.
That’s what production readiness actually looks like.
If you found this guide useful, consider sharing it with your team or bookmarking it for your next deployment.
We regularly write about backend architecture, DevOps practices, and building reliable production systems. Visit our site for more engineering deep dives and practical guides from the field.